Deploy .Net Core Application on IIS
ASP Dot Core is a cross platform and open source framework which is used to build modern web applications,
APIs and other. In this article we are going to see how to deploy or publish the ASP.NET Core web application in IIS.
Prerequisites For Deployment
Step- 1 : Create ASP.Net Core Application
Let's create any ASP.Net Core Web application using visual studio 2019. I have created a ASP.Net Core (Ver 3.1) application. Solution is as below:

Step- 2 : Now Publish ASP.Net Core Application
Right click on solution and select Publish option from menu. You will see below screen for publish configuration/option. You can save/edit these option for your current project. Set target location where you want to put your published application.

Set publish settings and other settings like target framework, Deployment mode, Target Runtime etc.

Summary for publish options will be like this:

Step- 3 : Put published folder at deployment server/machine
After publishing project you will find that entire application (View files, Controllers and other C# classes) converted into DLL. Copy root folder from development machine to deployment server.
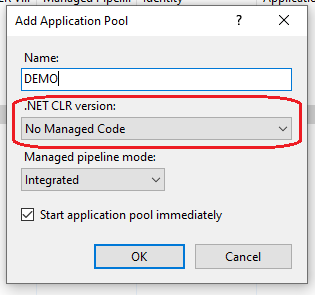
Step- 4 : Create application pool and host at IIS
Create virtual directory at deployment server like normal .Net application and select .Net CLR version for application pool as No Managed Code
and Managed Pipeline mode as Integrated.
Step- 5 : Change Configuration (Web.config) File
Now main action need to do with web.config file. We need to add ProcessPath and log file path in < system.webServer > section like below:

Here you need to set log file path from stdoutLogFile, which will write error (if any) at this path and this would help you to do accordingly like installation of some missing SDK of .Net core etc.
Now your .Net core application is ready to browse with your application's virtual name.
Summary
Hopefully this article will help you to publish your .Net application at IIS/Window Server. Please give your valuable suggestions/feedback regarding this article
Cheers!